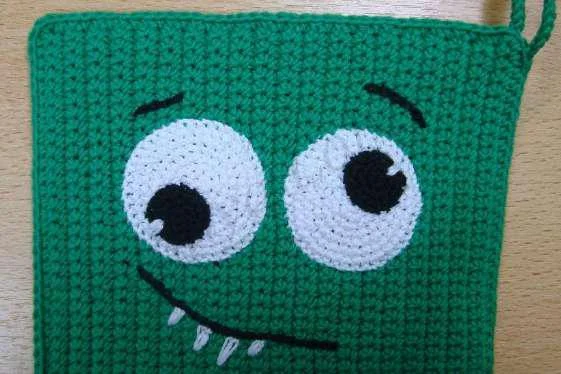
Size of pot holders ≈ 16*16 cm For the pot holder, use a 2.5 mm crochet hook, VITA cotton Lira yarn, or another similar yarn, cotton with acrylic, 120-150 m/50 g (almost a full skein required). For embellishments – use a 1.5-1.75 mm crochet hook, VITA cotton Сосо yarn, 240 m/50 g, white for eyes, black for pupils and embroidery, red for the tongue.
CH – chain SC – single crochet SL ST – slip stitch INC – increase INC 3-in-1 – 3 SC worked into the same stitch of the previous row
Potholder:
We work in rows back and forth, at the end of each row make a chain, turn the work, start the next row from the 2nd stitch from the hook (the loop on the hook is not counted).
Start by chaining 40.
Row 1: Starting from the 2nd chain from the hook, crochet 39 single crochets (SC) along the chain. Rows 2-40: 39 SC Cut the yarn, fasten off.
Crochet another identical piece, repeating rows 1-40, do not cut the yarn. Place the pieces together, and crochet them together along three sides of the SC square, making an INC 3-in-1 in the corners. Do not cut the yarn, connect the fourth side as well, but after finishing the facial features.
Eyes:
Fine thread, fine hook Whole egg: Row 1: 6 single crochets (SC) in an amigurumi ring Row 2: 6 increases (INC) = 12 SC Row 3: (INC, 1 SC)6 = 18 SC Row 4: (2 SC, INC)6 = 24 SC Row 5: (INC, 3 SC)6 = 30 ( )6 – repeat 6 times
6th row: (3 single crochets (SC), INC, 1 SC)*6 = 36 SC 7th row: (INC, 5 SC)*6 = 42 SC Make a slip stitch (SL ST), cut the yarn, leaving a tail for sewing, fasten off
Half egg: This part is crocheted with both front and back rows (to avoid clearly defined stripes). Back loop single crochets (BL SC) are made the same as regular single crochets, only the hook is inserted from the back, and the yarn is picked up from the front. At the end of each row, make a chain, turn the work, start the next row from the 2nd stitch from the hook (the loop on the hook is not counted). Row 1: 3 SC in an amigurumi ring, do not close the ring, make a chain, turn the work Row 2: 3 INC = 6 SC Row 3 (BL): (INC, 1 SC)*3 = 9 SC Row 4: (INC, 2 SC)*3 = 12 SC Row 5 (BL): (INC, 3 SC)*3 = 15 SC Row 6: (1 SC, INC, 3 SC)*3 = 18 SC Row 7: Crochet around the piece:
- Work (INC, 5 SC) twice, INC, 4 SC along the curved side
- Crochet 4 SC directly into the last stitch, forming a corner
- Crochet SC along the straight side, inserting the hook along the edge between rows (approximately 11-12 SC)
- Crochet INC 3-in-1 into the last stitch along the straight side Make a slip stitch (SL ST) into the first stitch of the row, cut the yarn, leaving a tail for sewing, fasten off
Whole pupil: Row 1: 6 SC in an amigurumi ring Row 2: 6 INC = 12 SC Row 3: (INC, 3 SC)*3 = 15 SC Make a slip stitch (SL ST), cut the yarn, leaving a tail for sewing, fasten off
Half pupil: Row 1: 3 SC in an amigurumi ring, do not close the ring, make a chain, turn the work Row 2: 3 INC = 6 SC
Row 3: Crochet around the piece:
- Into the last stitch of the previous row, crochet another single crochet (SC) (with the previous increase, there will be 3 SC in one stitch)
- Crochet single crochets (SC) along the straight side, inserting the hook between rows along the edge (approximately 3-4 SC)
- Into the first stitch along the curved side, crochet an increase 3-in-1, then 1 SC, increase, 1 SC, increase, 1 SC Make a slip stitch (SL ST) into the first stitch of the row, cut the yarn, leaving a tail for sewing, fasten off
Tongue: Fine thread, fine hook Start by chaining 3, we will work in the round Round 1: Starting from the 2nd chain from the hook (the loop on the hook is not counted), crochet an increase (INC), 5 single crochets (SC) into the same chain (the last chain of the starting chain), 3 SC into the next chain (the first chain of the starting chain where the first increase is worked) = 10 SC Round 2: INC, 2 SC, 3 INC, 2 SC, INC, 1 SC = 15 SC Round 3: 1 SC, INC, 3 SC, 3 INC, 4 SC, INC, slip stitch (SL ST) – incomplete round Cut the yarn, leaving a tail for sewing, fasten off
When sewing, strive for evenness and neatness, so insert something rigid and fairly flat into the pot holder, such as narrow-format books (cardboard, small boards, photo frames, dish stands). Tuck all yarn ends inside the pot holder and secure them there. In the photo below, you can see approximately the distance at which the details are sewn/embroidered on our pot holders.
- Sew on the eyes, do not cut the thread.
- Sew on the pupils.
- Use the leftover white yarn to embroider highlights, make 2 backstitches through every other black row, in the same holes (you can do 3-4 regular stitches).
- Embroider the mouth, eyebrows, and any other details using backstitches.
If there’s a tongue: First embroider the mouth up to where the tongue will be, sew on the tongue, then finish embroidering the mouth.
If there are teeth: First, fully embroider the mouth, then embroider the teeth from the center outwards. Our teeth are made with 2 backstitches starting from a common point, from bottom to top.


Once everything is sewn and embroidered, crochet the last side of the pot holder. We’ll make a loop with a double chain, so after finishing the last row, pull out the other end of the yarn from the skein, bring it next to the working yarn, and use this yarn to make a slip stitch (SL ST) into the first stitch of the row. Now we have both yarn ends on the hook, it doesn’t matter which one is the beginning and which one is the end (shown in the diagram), they are exactly the same.
Crochet 22 stitches with a double chain.
Cut the yarn, then attach the ends of the chain to the pot holder, making a loop, and tuck them inside.
For inspiration))