How to Make a Crochet Bralette: Step-by-Step Guide for Beginners
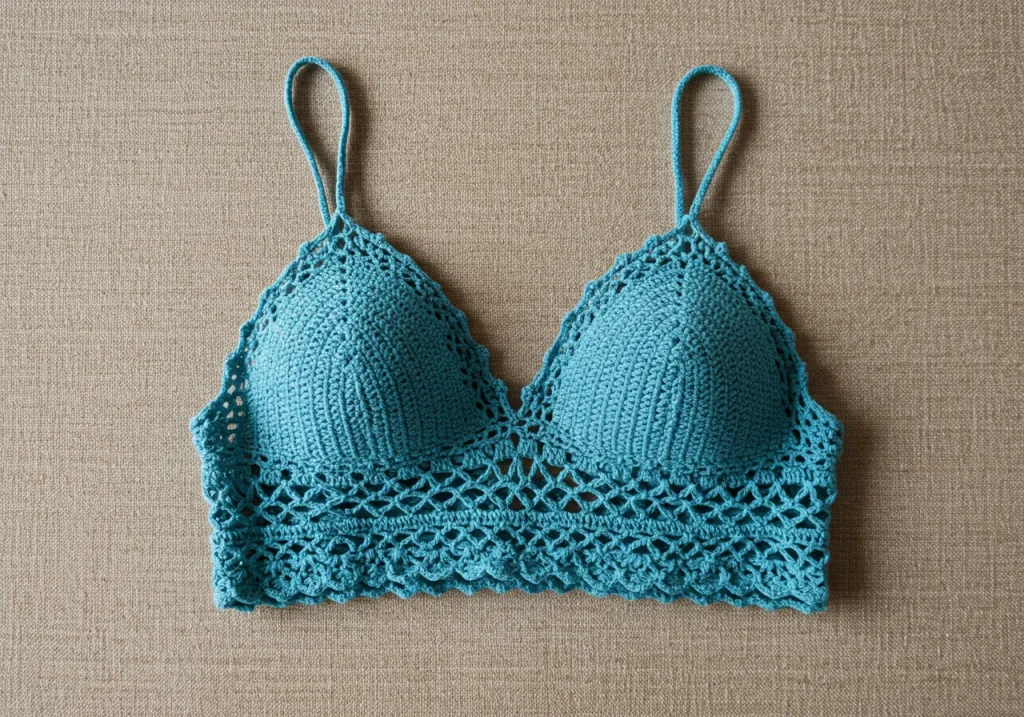
Crochet bralettes have become a trendy and functional fashion piece, especially during the warmer months. These handmade creations are not only beautiful but also customizable to your unique body shape and style. Whether you’re a beginner or looking to add a new skill to your crochet repertoire, learning how to make a crochet bralette can be a fun and rewarding project.
In this detailed step-by-step guide, we will walk you through the entire process of crafting your own crochet bralette. By the end, you’ll be equipped with the knowledge to create your own custom designs, from choosing the right materials to adding finishing touches. Let’s dive in!
Why Crochet Bralettes Are So Popular
Before we jump into the tutorial, let’s briefly talk about why crochet bralettes have become such a fashion staple.
- Boho Vibes: Crochet bralettes, especially the bohemian crochet bralette style, are popular for their free-spirited, artistic aesthetic.
- Comfort: Unlike traditional bras, crochet bralettes are usually lighter and more comfortable, especially in hot weather.
- Customization: You can create your own unique designs, adjust the fit, and choose your preferred yarn colors and textures.
- Sustainability: Handmade crochet pieces are often made with eco-friendly materials, aligning with a more sustainable and conscious approach to fashion.
Now, let’s get started on creating your very own crochet bralette!
Materials You’ll Need for Your Crochet Bralette
Before diving into the steps, make sure you have all the necessary materials:
- Yarn: Choose a soft, breathable yarn. Cotton or cotton blends work wonderfully for crochet bralettes, as they are lightweight and comfortable. You may also use lace yarn for a more delicate, lacy feel, perfect for crochet lingerie.
- Crochet Hook: A 3.5mm to 4mm crochet hook is ideal for bralette projects, but this can vary depending on your yarn thickness. Be sure to check the yarn label for recommendations.
- Measuring Tape: To ensure a perfect fit, measuring tape is crucial for checking the size as you go.
- Scissors: To cut your yarn at the end.
- Tapestry Needle: This is used to weave in loose ends and secure your work.
- Optional: If you want a more structured feel, you can add adjustable straps or a small amount of elastic to the band for extra comfort.
Step 1: Take Your Measurements
The first step to making a crochet bralette is to take the necessary measurements. This will ensure that your finished piece fits you perfectly.
- Band Measurement: Measure around your ribcage, right under your bust. This is where the band of your bralette will sit.
- Cup Measurement: Measure around the fullest part of your bust. This will help determine the size of your cups.
Step 2: Create the Foundation
Start by making a foundation chain for the band of your bralette. This chain will form the base that goes around your ribcage.
- Make a foundation chain that matches the band measurement. Ensure it’s a multiple of the stitch pattern you’re using.
- Once you have the desired length, join with a slip stitch to form a circle. Be careful not to twist the chain.
Step 3: Crochet the Band
Now that you have your foundation, it’s time to crochet the band of your bralette. This is where you’ll start building the structure.
- Row 1: Work in double crochet (DC) or single crochet (SC), depending on your desired tension and style.
- Rows 2+: Continue crocheting in the round or back-and-forth, depending on your pattern. If you’re using a boho crochet bralette design, you can incorporate a textured stitch pattern such as the shell stitch or the basket weave.
For a crochet bikini top look, try to keep the band on the tighter side to ensure good support.
Step 4: Create the Cups
Next, you’ll create the two cups of your crochet bralette. The shape of the cup will depend on the style you want. Some prefer a more triangular, vintage crochet bralette look, while others may opt for a crochet bralette with underwire or a seamless, soft-cup design.
- Start by crocheting a small foundation chain for each cup, based on your cup measurement.
- Work in increasing rows until you have reached the desired cup size. For a fuller cup, you can increase more frequently.
- You can opt for a crochet halter bralette by attaching the cups with a chain at the top to form the straps.
Tip: For added support, consider adding a small amount of elastic to the top or bottom edge of the cups.
Step 5: Connect the Band and Cups
Once you’ve completed both cups, it’s time to attach them to the band. This is where you’ll get the bralette shape and structure.
- Place the cups: Position the cups on the band, ensuring they are even and spaced appropriately.
- Sew them together: Using a tapestry needle and a matching yarn, sew the cups securely onto the band.
- If you’re adding straps, crochet long chains or create small straps from the same yarn to attach to the cups.
For a crochet bralette with straps, make sure the straps are long enough for comfort. You can adjust them later by tying knots for a better fit.
Step 6: Add Finishing Touches
Your crochet bralette is nearly complete! Let’s finish it off with some decorative and functional touches.
- Edging: Add a scalloped or lacy edge around the cups and band for a delicate, feminine finish. This can be done by working a round of single crochet and then a round of slip stitches or picots.
- Adjustable Straps: If you prefer adjustable straps, you can add small buttons or hooks to allow for length modification.
- Weave in Loose Ends: Use the tapestry needle to weave in all loose yarn ends to ensure your work stays neat and secure.
Step 7: Try It On and Adjust
Once everything is assembled, it’s time to try on your crochet bralette. Check for fit, comfort, and support. You can make adjustments by adding more rows to the band or cups or adjusting the straps for the perfect fit.
If you want to add a personal touch, you can experiment with different crochet bralette designs and crochet top patterns, like lace crochet or adding embellishments such as beads or fringe.
Conclusion: Enjoy Your Custom Crochet Bralette
Making a crochet bralette is an enjoyable and creative process that allows you to craft something beautiful and functional. Whether you’re making a crochet bralette for festivals or simply creating a cozy piece for everyday wear, the options are endless. Plus, crocheting your own bralette is a sustainable choice, reducing the need for fast fashion.
Ready to get started? If you need some inspiration or high-quality materials, check out our curated selection of crochet patterns and supplies at 9oufti.shop.
Also, feel free to explore boho crochet bralette designs and other crochet lingerie ideas to add to your wardrobe this season. If you’re looking for a specific pattern or technique, check out these external resources for more inspiration:
- How to Crochet a Bralette: Beginner-Friendly Guide
- Top Crochet Bralette Patterns for Every Skill Level
With the right materials, creativity, and a little bit of patience, you’ll have your own custom crochet bralette in no time. Happy crocheting!
