Materials:
- Yarn in the following colors: light gray, yellow, red
- Crochet hook appropriate for your yarn (likely 2.5mm-3.5mm)
- Safety eyes (10-12mm)
- Fiberfill stuffing
- Yarn needle
- Stitch markers
- Black embroidery thread for facial details
Abbreviations:
- MR: Magic Ring
- sc: single crochet
- inc: increase (2 sc in one stitch)
- dec: decrease (sc two stitches together)
- sl st: slip stitch
- ch: chain
- st: stitch
- FO: fasten off
Head:
- With light gray yarn, make a MR, 6 sc in MR (6)
- inc in each st around (12)
- (sc, inc) around (18)
- (2 sc, inc) around (24)
- (3 sc, inc) around (30)
- (4 sc, inc) around (36) 7-12. sc in each st around (36)
- (4 sc, dec) around (30)
- (3 sc, dec) around (24)
- (2 sc, dec) around (18)
- Insert safety eyes between Rounds 10 and 11, about 6 stitches apart.
- (sc, dec) around (12)
- dec around (6)
- FO and weave in the ends. Stuff the head firmly.
Snout:
- With light gray yarn, make a MR, 6 sc in MR (6)
- inc in each st around (12)
- (sc, inc) around (18)
- (2 sc, inc) around (24) 5-6. sc in each st around (24)
- (2 sc, dec) around (18)
- sc in each st around (18)
- (sc, dec) around (12)
- dec around (6)
- FO and leave a long tail for sewing. Stuff lightly.
Ears (make 2):
- With light gray yarn, make a MR, 6 sc in MR (6)
- (sc, inc) around (9)
- sc in each st around (9)
- FO and leave a long tail for sewing. Do not stuff.
Body:
- With yellow yarn, make a MR, 6 sc in MR (6)
- inc in each st around (12)
- (sc, inc) around (18)
- (2 sc, inc) around (24)
- (3 sc, inc) around (30)
- (4 sc, inc) around (36) 7-10. sc in each st around (36)
- Switch to light gray yarn, sc in each st around (36) 12-17. sc in each st around (36)
- (4 sc, dec) around (30)
- (3 sc, dec) around (24)
- (2 sc, dec) around (18)
- (sc, dec) around (12)
- dec around (6)
- FO and weave in the ends. Stuff the body firmly.
Arms (make 2):
- With light gray yarn, make a MR, 6 sc in MR (6)
- (sc, inc) around (9) 3-8. sc in each st around (9)
- FO and leave a long tail for sewing. Lightly stuff the arms.
Legs (make 2):
- With light gray yarn, make a MR, 6 sc in MR (6)
- inc in each st around (12)
- (sc, inc) around (18)
- (2 sc, inc) around (24) 5-7. sc in each st around (24)
- (2 sc, dec) around (18)
- (sc, dec) around (12) 10-12. sc in each st around (12)
- FO and leave a long tail for sewing. Firmly stuff the legs.
Tail:
- With light gray yarn, make a MR, 6 sc in MR (6)
- (sc, inc) around (9) 3-4. sc in each st around (9)
- (sc, dec) around (6) 6-8. sc in each st around (6)
- Switch to red yarn, sc in each st around (6)
- FO and leave a long tail for sewing. Stuff lightly.
Wings (make 2):
- With red yarn, ch 7, turn
- sc in 2nd ch from hook, sc in each ch across (6)
- ch 1, turn, inc, sc across (7)
- ch 1, turn, inc, sc across (8)
- ch 1, turn, inc, sc across (9)
- ch 1, turn, inc, sc across (10)
- FO and leave a long tail for sewing. Do not stuff.
Spikes (make 5):
- With red yarn, make a MR, 6 sc in MR (6) 2-3. sc in each st around (6)
- FO and leave a long tail for sewing. Do not stuff.
Assembly:
- Stuff the head, body, arms, legs, and tail.
- Sew the head to the body, aligning the bottom of the head with the top of the body.
- Attach the snout to the front of the head, centered between the eyes.
- Sew the ears to the top sides of the head.
- Attach the safety eyes.
- Sew the arms to the sides of the body, just below the head.
- Attach the legs to the bottom of the body.
- Sew the tail to the back of the body.
- Attach the wings to the back of the body, slightly above the tail.
- Sew the spikes to the top of the head and along the back, spacing them evenly.
- Embroider the nostrils, mouth, and other facial details with black yarn.
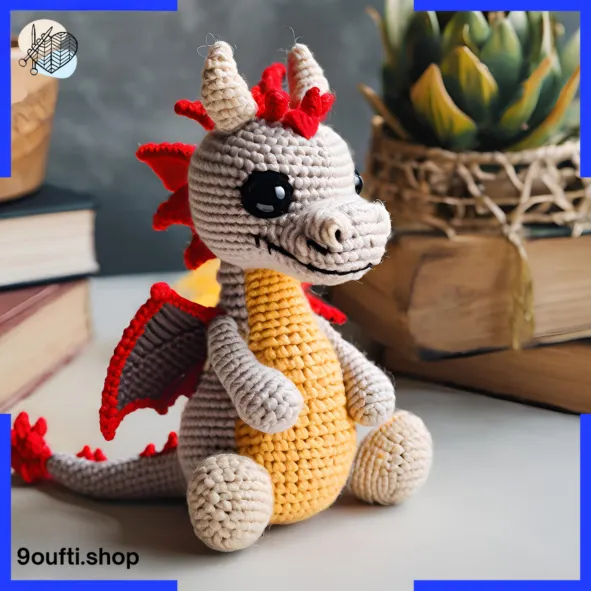
Your detailed dragon amigurumi is now complete! Enjoy crafting this adorable project.