Materials:
- Worsted weight yarn in White (for the body) and Blue (for the wings)
- Crochet hook size 3.5 mm (E-4) or suitable for your yarn
- Polyester fiberfill for stuffing
- Safety eyes (10mm) or black yarn for embroidered eyes
- Yarn needle for sewing and weaving ends
- Stitch marker (optional)
- Black embroidery thread for the mouth and eye details
Abbreviations:
- ch: chain
- sc: single crochet
- inc: increase (2 sc in the same stitch)
- dec: decrease (single crochet 2 stitches together)
- sl st: slip stitch
- FO: finish off
Head and Body (White Yarn):
- Head:
- Round 1: Make a magic ring, 6 sc in the ring. (6)
- Round 2: Inc in each stitch around. (12)
- Round 3: 1 sc, inc repeat around. (18)
- Round 4: 2 sc, inc repeat around. (24)
- Round 5: 3 sc, inc repeat around. (30)
- Round 6-10: Sc in each stitch around. (30)
- Round 11: 3 sc, dec repeat around. (24)
- Round 12: 2 sc, dec repeat around. (18)
- Round 13: 1 sc, dec repeat around. (12)
- Insert safety eyes between Rounds 8 and 9, spaced about 6 stitches apart.
- Round 14: Dec around. (6)
- FO and leave a tail for sewing. Stuff the head firmly.
- Body:
- Round 1: Make a magic ring, 6 sc in the ring. (6)
- Round 2: Inc in each stitch around. (12)
- Round 3: 1 sc, inc repeat around. (18)
- Round 4-7: Sc in each stitch around. (18)
- Round 8: 1 sc, dec repeat around. (12)
- Round 9: Sc in each stitch around. (12)
- Round 10: Dec around. (6)
- FO and leave a tail for sewing. Stuff the body firmly and sew it to the head.
Ears (White Yarn) – Make 2:
- Round 1: Make a magic ring, 4 sc in the ring. (4)
- Round 2: 1 sc, inc repeat around. (6)
- Round 3-5: Sc in each stitch around. (6)
- Round 6: 1 sc, dec repeat around. (4)
- FO, leave a tail for sewing. Sew the ears to the top of the head.
Wings (Blue Yarn) – Make 2:
- Row 1: Ch 14, starting from the 2nd ch from the hook, sc in each stitch back down the chain. (13)
- Row 2: Ch 1, turn, sc in each stitch across. (13)
- Row 3: Ch 1, turn, dec, sc in the next 9 sts, dec. (11)
- Row 4: Ch 1, turn, sc in each stitch across. (11)
- Row 5: Ch 1, turn, dec, sc in the next 7 sts, dec. (9)
- Row 6: Ch 1, turn, sc in each stitch across. (9)
- Row 7: Ch 1, turn, dec, sc in the next 5 sts, dec. (7)
- Row 8: Ch 1, turn, sc in each stitch across. (7)
- Row 9: Ch 1, turn, dec, sc in the next 3 sts, dec. (5)
- Row 10: Ch 1, turn, sc in each stitch across. (5)
- Row 11: Ch 1, turn, dec, sc in the next 1 st, dec. (3)
- Row 12: Ch 1, turn, sc in each stitch across. (3)
- Row 13: Ch 1, turn, dec, sc in the last st. (2)
- Row 14: Ch 1, turn, dec. (1)
- FO and weave in the ends.
- Edging: Attach the blue yarn to the edge of the wing and sc evenly around the entire wing, working 2 sc in each corner. This will give the wings a more finished look and a slight curve.
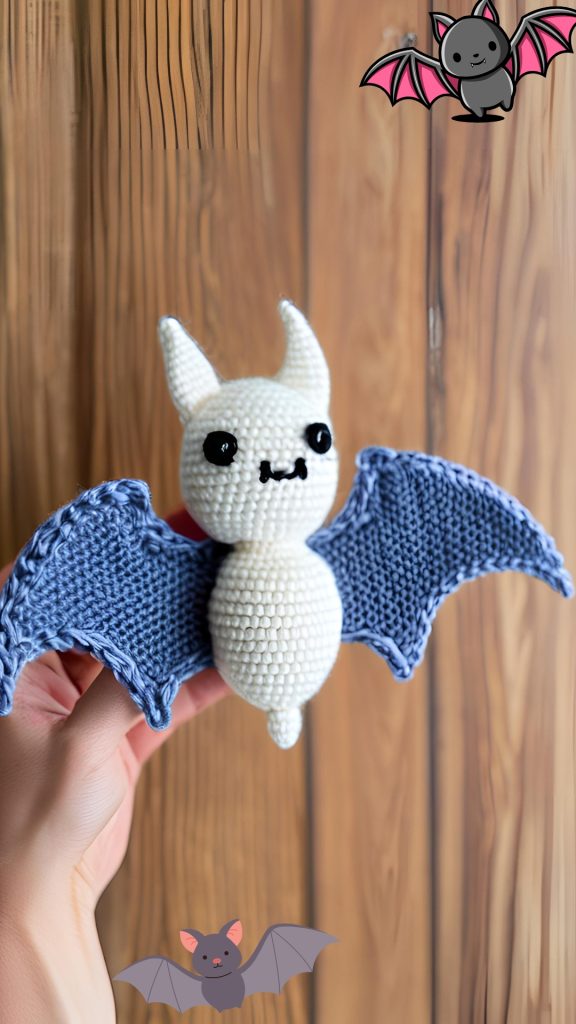
- Sew the wings to the sides of the body, positioning them at an angle that makes the bat look like it’s ready to fly.
Legs (White Yarn) – Make 2:
- Round 1: Make a magic ring, 6 sc in the ring. (6)
- Round 2-4: Sc in each stitch around. (6)
- FO and leave a tail for sewing. Stuff lightly and attach to the bottom of the body.
Assembly:
- Embroider a small “v” shape for the mouth using black thread.
- Make sure all parts are securely attached, and weave in any remaining ends.
This bat amigurumi is a fun and relatively simple project that should make for an adorable addition to your crochet creations.


