Brief overview of the Jacket Granny Square pattern
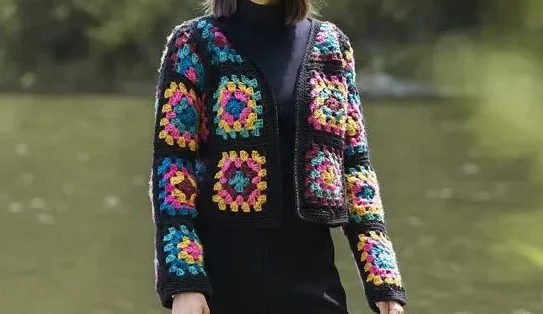
EASY CROCHET SWEATER/CARDIGAN PATTERN FOR WOMEN
Adopting the mod of granny squares, a lacerated style jacket that looks very cool against a black ground: riotous granny squares set off against it. Feel free to choose colors from the Red Heart Soft palette to make your jacket yours. This stylish and warm piece is a great modern variation of the classic jacket.
Granny Square pattern Materials Needed:
Yarn: Red Heart® Super Saver® O’Go™ yarn, assorted colors. Find other patterns and the same colors of yarn used in this project at Yarnspirations.com. Crochet Hook: Size U.S. 7 (4.5 mm), or whatever size necessary to achieve gauge. Miscellaneous: A yarn needle for weaving in ends.

Use U.S. size 7 (4.5mm) crochet hook; or size that is necessary to obtain gauge. You will need also a yarn needle.
Granny Square pattern Overview:
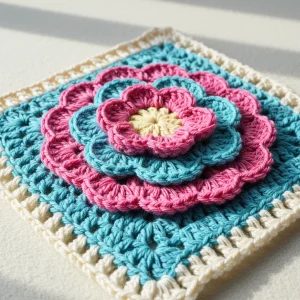
This is a classic pattern worked in crochet that provides so much versatility with the burst of colors. Working a number of square and triangular motifs, in a color to fit the pattern. Each motif is crafted to blend seamlessly, creating a stunning visual effect when assembled.
granny square pattern SKILL LEVEL: EASY
Sizes and Measurements
Abbreviations Used in Crochet Patterns
Approx: Approximately
Rnd(s): Round(s)
Sl st(s): Slip stitch(es)
RS: Right side
Beg: Begin(ning)
Sc: Single crochet
Sp(s): Space(s)
Ch: Chain(s)
Sc2tog: Draw up a loop in each of next 2 stitches, yarn over hook and draw through all loops on hook
St(s): Stitch(es)
Dc: Double crochet
Pat: Pattern
Tog: Together
WS: Wrong side
Rem: Remain(ning)
Yoh: Yarn over hook
Rep: Repeat
| Size | To Fit Bust (inches) | Finished Bust (inches) |
|---|---|---|
| XS/S | 28-34″ [71-86.5 cm] | 39¾” [101 cm] |
| M | 36-38″ [91.5-96.5 cm] | 39¾” [101 cm] |
| L | 40-42″ [101.5-106.5 cm] | 52¼” [132.5 cm] |
| XL | 44-46″ [112-117 cm] | 52¼” [132.5 cm] |
| 2/3XL | 48-54″ [122-137 cm] | 52¼” [132.5 cm] |
| 4/5XL | 56-62″ [142-157.5 cm] | 64¾” [164.5 cm] |
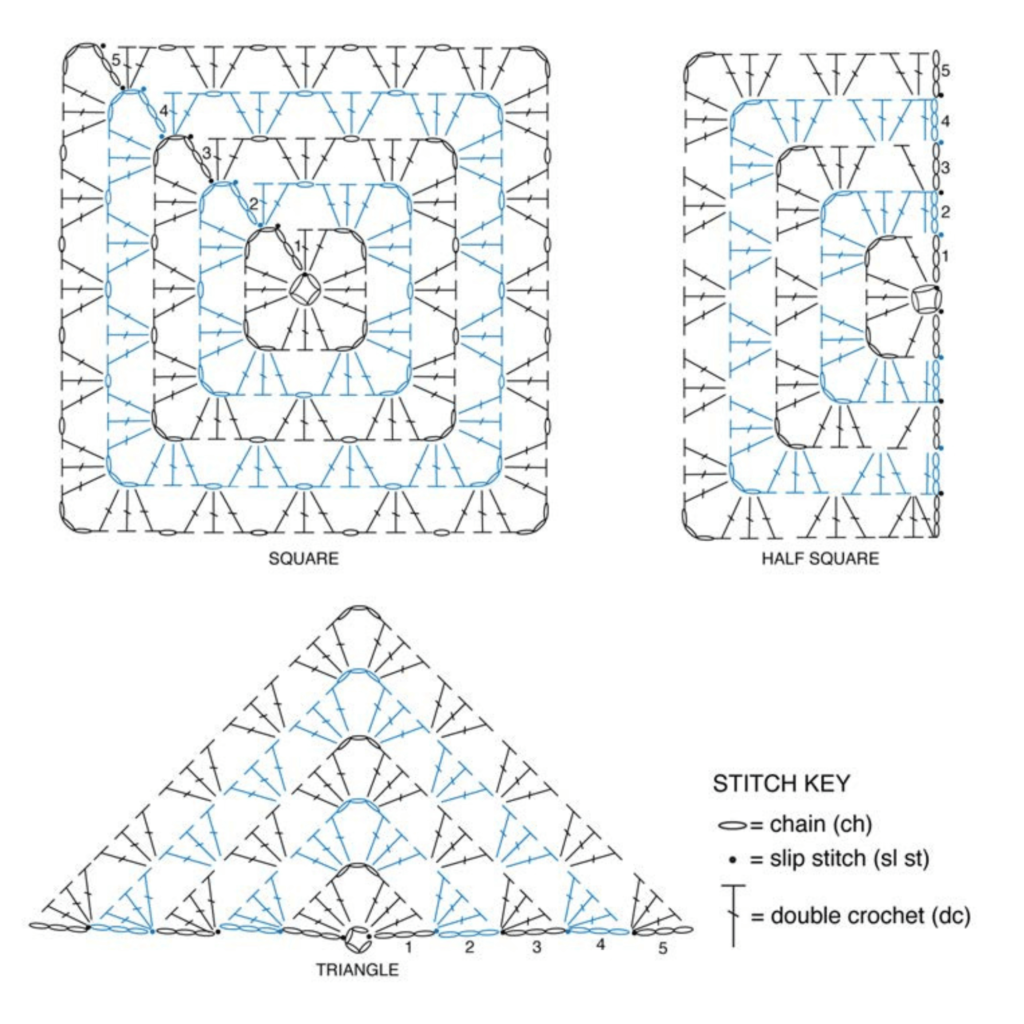
Square Motif Instructions
Row 4: Join with Color 4 in beg ch-3 space, (work 25 (25-34-34-34-52) clusters twice with (ch 1, 3 dc) in each ch-1 space, until the next ch-3 sp is reached. Work 1 ch-3 sp, beg), ch 1, 2 dc.
Work across the row. Fasten off, cut the yarn, leaving a long tail, and pull it through the loop on the hook. You should now have 48 double crochet, 12 chain 1 space, and 4 chain 3 space.
Row 5: Repeat row 4 for a total of 60 double crochet and 16 chain-1 spaces across, using the Main color (MC) in each ch-1 space to (ch-3, dc, ch-2, dc).
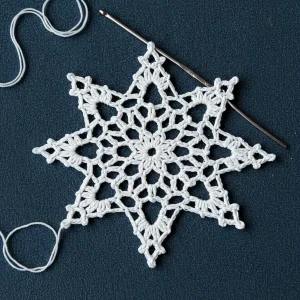
Triangle Motif Instructions (Make 2) Start with Color 1: Chain 4 and form a ring with a slip stitch into the first chain. Refer to the diagram on page 3. Round 1: (right side) Ch 6, then work (3 dc, ch 3) 3 times into ring. Add 2 dc, sl st to join, and fasten off. You should have 12 dc and 4 ch-3 spaces. Round 2: Attach Color 2 at any chain-3 space, chain 6, and make 3 double crochets in the same chain-3 space. Repeat (chain 1, 3 double crochet, chain 3, 3 double crochet) in the next ch-3 sp. Repeat from * twice more, ch 1, then dc twice to This completes the edges with 21 double crochets, 4 chain-1 spaces, and 4 chain-3 spaces. Additional Notes:
The chain 3 at the beginning of rounds counts as one double crochet. The chain 6 at the start of rounds acts as both a double crochet and a chain-3 space. Close each round with a slip stitch into the third chain of the initial chain-6, unless specified otherwise. For visual guidance, refer to the diagram provided on page 3.
Seaming Crochet Pieces Together
GAUGES
14 single crochets and 15 rows equal 4 inches (10 cm).
Square Motif = Approx 6¼” [16 cm]
square.
INSTRUCTIONS
Notes:
- To begin working with the O’Go
format, carefully cut plastic tie
where the ends of the O’Go meet. - Pull tie to remove.
- For this pattern, colors can
be easily separated by gently
pulling apart and cutting at the
color transition. Each color is
ready to use. Follow color guide
shown in Materials section for
each O’Go (Contrast A, B, C, D
and E). You may find it helpful
to place each color section in its
own resealable (zip lock) bag and
Mark each bag with the labels A, B, C, D, and E. - RS of work is facing when
working rnds/rows. - When working all Motifs – as
Color 1, Color 2, Color 3 and
Color 4 is noted, choose Contrast
A, B, C, D or E. - Use MC for last rnd/row of
all Motifs. - Divide the use between Contrast A and Contrast B.
- C, D and E equally.
Row 4:
Begin by joining Color 4 in the first chain-3 space: Chain 3 and double crochet within the same chain-3 space.
3 double crochets between the starting and following 3-double crochet groups to make a corner; repeat from * once, working 3 double crochets between the next two 3-double crochet groups two more times for another corner.
Work 1 double crochet, 3 chains, and 1 slip stitch in the last chain-3 space; secure and cut the thread.
Sleeve Edging:
Rounds 2-4: ch 1. *Sc to 1 st before the next sp, 3 sc in each corner. Repeat from * around in sc, end with a sl st in the first sc. Repeat from * once more, ending with sc3tog in the circle of the Assembly Diagram. Join and turn the work.
M, L, XL, 2/3XL, 4/5XL Sizes:
Right side facing: Join main color (MC) with slip stitch at star (*) at sleeve corner as shown on assembly diagram.
Ch 3 (counts as 1 double crochet), work 1 double crochet in each double crochet to the end of the row. Turn work.
5th Row:
Reattach MC in the first ch-3 sp: ch 3, work 2 dc between first dc and next 3 dc group.
Continue to work a group of 3 double crochets in the next space between groups of 3 double crochets, 3 double crochets, chain 3, and 3 double crochets in the next chain-3 space. Finish off the row by working 3 double crochets between the two groups of 3 double crochets, 3 double crochets between the last group of 3 double crochets and the last double crochet, chain 3, and then slip stitch into the last chain-3 space. Secure and cut the yarn.
Assembly and Finishing:
Assembly Edge: Join with main color (MC) at back neck with right side facing, chain 1 and work 1 single crochet evenly across back neck, down right front, around right front bottom, across back, up left front, around remaining back neck. Place three single crochets at each front bottom corner. Connect by making a slip stitch into the initial single crochet.
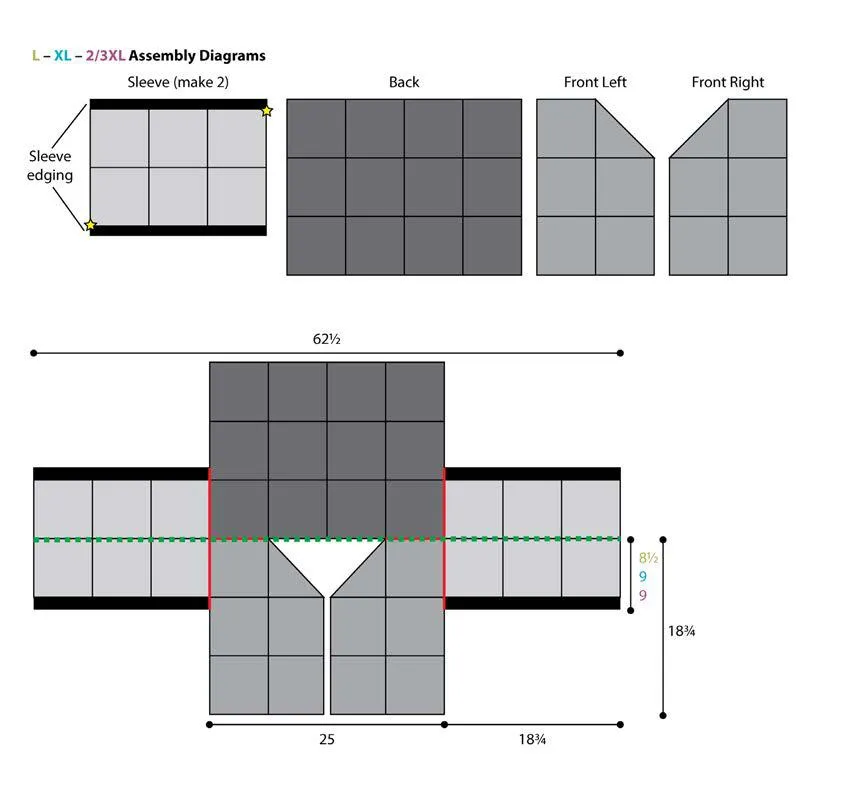
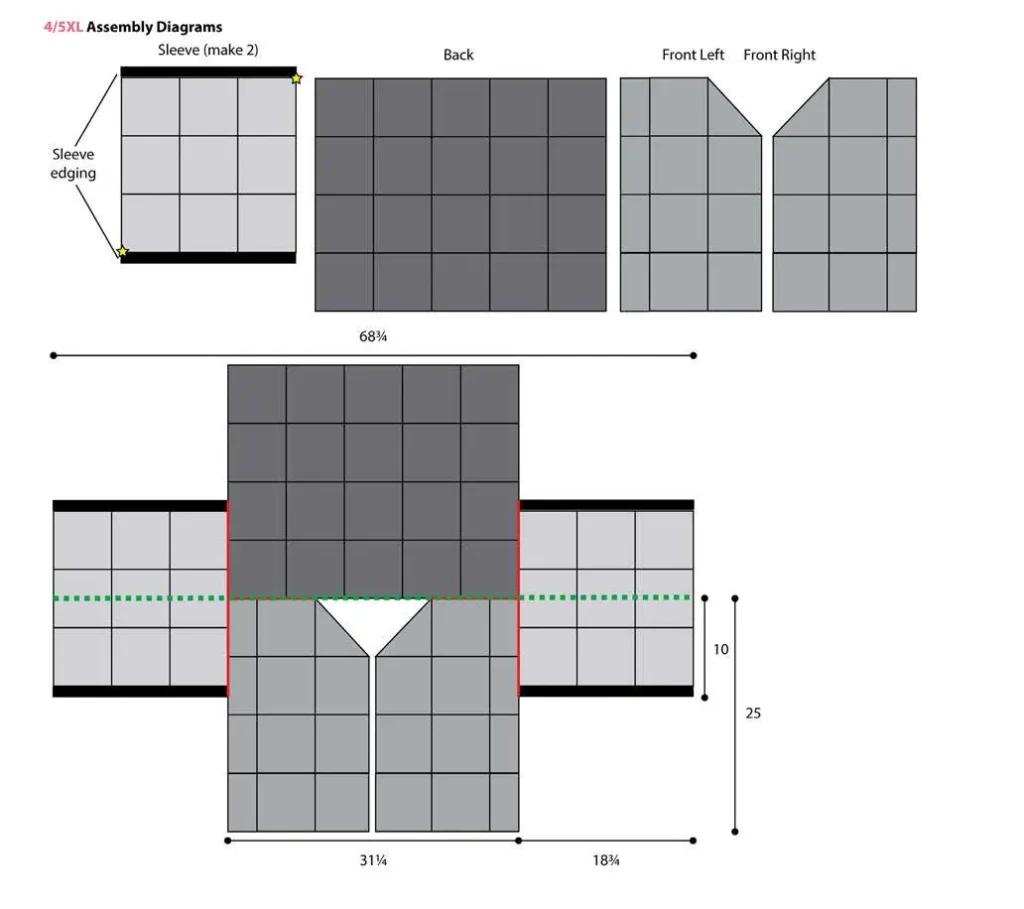
Assembly Instructions: Follow assembly diagrams instructions for XS/S through to 4/5XL on pages 4 and 5 to sew together motifs to form the Sleeve, Back, and Front pieces. Using a whipstitch, seam your garment together with reference to the video tutorial. Sew the side and underarm seams as directed, folding the pieces along the dotted green lines.
Cuffs:
Setup: With the right side (RS) facing, attach the main color (MC) using a slip stitch at the sleeve edge.
Rnd 1: Ch 1, sc evenly around the sleeve opening—44 (56-60-64-64-70) sc. Attach with a slip st in first sc. Rnds 2-4: Ch 1, sc in same st as join, join with a sl st to beg sc.
Finishing: Secure and cut the yarn after the fourth round.

The original granny square pattern? find it here.