Materials:
- Medium-weight yarn (multiple colors)
- Crochet hook: 4.5 mm or 5 mm (depending on yarn weight)
- Yarn needle for sewing squares together
- Scissors
Abbreviations:
- ch = chain
- sl st = slip stitch
- sc = single crochet
- dc = double crochet
- sp = space
- rnd = round
Step 1: Crochet Granny Squares
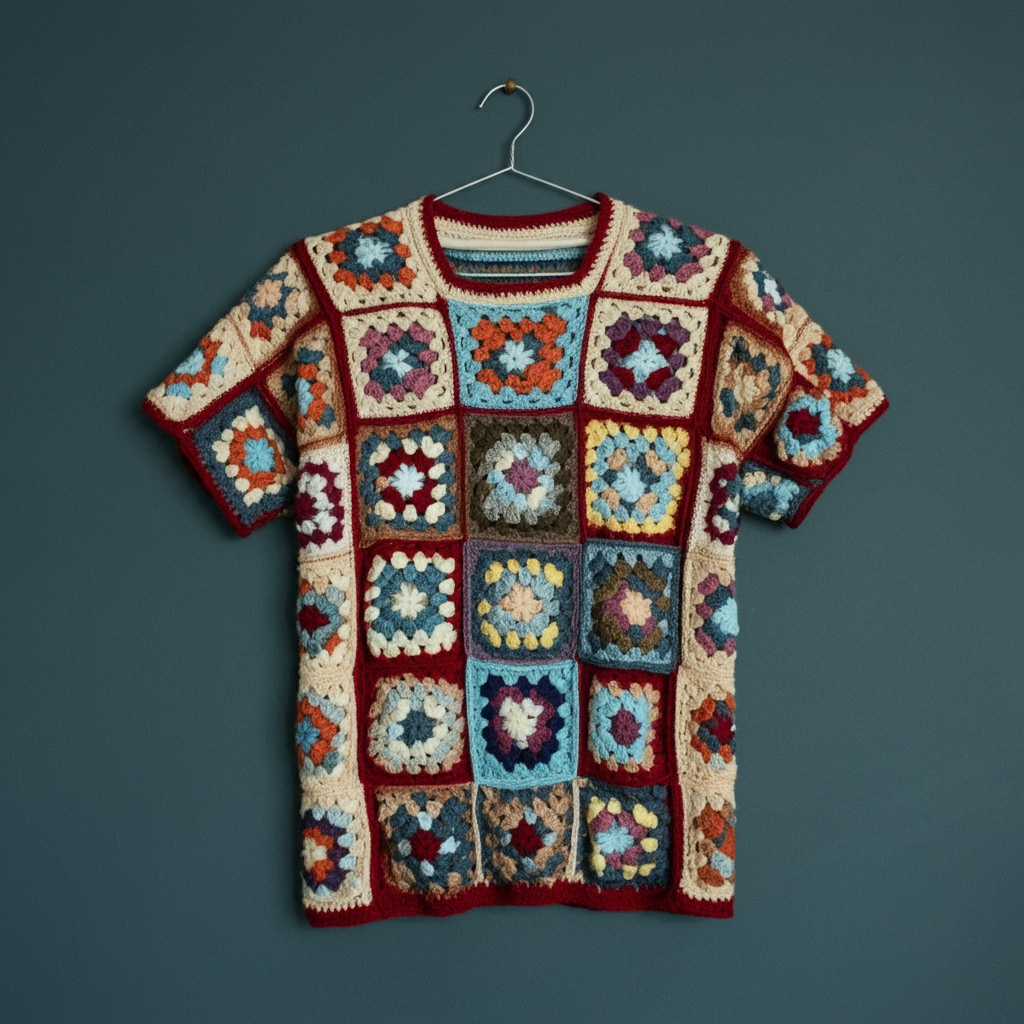
Each square will be a simple 4-round granny square. You can use different color combinations for each square, as shown in the sweater.
Basic Granny Square Pattern (for 1 square):
- Start: Make a magic ring (or chain 4, sl st to first ch to form a ring).
- Rnd 1: Ch 3 (counts as first dc). Work 2 dc into the ring. Ch 2, 3 dc into ring 3 times. Ch 2, sl st into top of the starting ch 3. (4 groups of 3 dc)
- Rnd 2: Sl st into the first ch-2 sp. Ch 3 (counts as first dc), 2 dc in same sp, ch 2, 3 dc in same sp. 3 dc, ch 2, 3 dc in next ch-2 sp 3 times. Sl st into top of starting ch 3.
- Rnd 3: Sl st into the next sp. Ch 3, 2 dc in same sp, ch 2, 3 dc in same sp (corner). 3 dc in the next sp, (3 dc, ch 2, 3 dc) in the next corner around. Sl st to join.
- Rnd 4: Repeat the same pattern, making corners in each ch-2 sp with (3 dc, ch 2, 3 dc), and working 3 dc in each side sp.
Fasten off and weave in ends.
Make as many squares as needed based on your measurements (the image shows around 32 squares: 4 across the front, 4 on the back, 2 for each sleeve, and 4 for the shoulders).
Step 2: Block and Join Granny Squares
- Block each square by lightly steaming or wetting them to shape.
- Join squares: Use a yarn needle and the mattress stitch (or slip stitch through the back loops) to sew the squares together. Layout:
- 4×4 squares for the front and back panels.
- 2×2 squares for each sleeve.
- 2-3 squares at the shoulders to join the front and back panels.
- Sew the panels together: First, sew the shoulders. Then join the sleeves to the body by aligning squares.
Step 3: Add Edging and Finish
- Neckline: Attach yarn at any point along the neckline. Work 1 round of sc evenly around, sl st to join. For a more polished look, you can add a row of ribbing:
- Ribbed edge (optional): Ch 6, sc in 2nd ch from hook and across (5 sc total). Sl st to next 2 sts on neckline, turn. Work back loop sc across 5 sc. Repeat this process around the neckline.
- Sleeves and Bottom Hem:
- Work 1 round of sc around each sleeve and bottom hem for a clean finish. Alternatively, use the same ribbing technique as the neckline for a consistent look.
Sizing & Adjustments:
- Increase/decrease sweater width: Add or reduce the number of granny squares.
- Adjust length: Use more or fewer rows of squares in the body and sleeves.
- Fit: If the sleeves feel tight, add extra rows of sc or half-double crochet for a looser fit.
Finishing:
- Weave in all loose ends.
- Block the entire sweater to smooth out the stitches and shape it perfectly.
This pattern offers flexibility in color choices and sizing, making it easy to replicate the aesthetic of the sweater from the image. Let me know if you need any specific modifications or further guidance!


