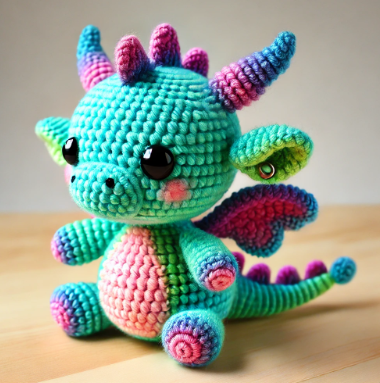
Supplies
- Size 6 bulky yarn for the body (29 yds/40g) in any color, with small amounts of alternate colors for the dragon’s wings, eyes, and horns. I used Bernat Blanket yarn.
- 10 mm safety eyes if preferred
- 8 mm crochet hook
- Stitch markers
- Yarn needle
- Scissors
- Stuffing material
Abbreviations (US Crochet Terms)
- mc: magic circle
- sc: single crochet
- hdc: half double crochet
- inc: increase (crochet 2 sc in the same stitch)
- dec: invisible decrease
- st: stitch
- sl st: slip stitch
- ch: chain
- BLO: back loop only
Special Stitches
- Invisible Decrease (dec): Insert hook into the front loops of the next two stitches. Yarn over and draw through the first two loops, yarn over and draw through the remaining two loops.
Notes
- Use a stitch marker at the start of each round for placement.
- The body and head of the dragon are worked in continuous rounds. The wings and horns are made separately and sewn on.
- Finished size: approximately 5.5” (14 cm) tall.
- You may prefer to use a 7 mm hook if using safety eyes to ensure tighter stitches.
Body of the Dragon
Round 1: 6 sc in mc (6)
Round 2: inc around (12)
Round 3: inc around (24)
Round 4: (3 sc, inc) x 6 (30)
Round 5: sc in BLO around (30)
Rounds 6-9: sc around (4 rounds) (30)
Round 10: (3 sc, dec) x 6 (24)
Round 11: sc around (24)
Round 12: (2 sc, dec) x 6 (18)
Cut the yarn, leaving a 12” tail for sewing.
Gently stuff the body as you go. Use the invisible finish for a clean closing.
Head of the Dragon
Round 1: 6 sc in mc (6)
Round 2: inc around (12)
Round 3: (1 sc, inc) x 6 (18)
Rounds 4-8: sc around (5 rounds) (18)
Round 9: (1 sc, dec) x 6 (12)
Round 10: dec around (6)
Cut yarn, leaving a 12” tail. Gently stuff and attach the head to the body using a whip stitch.
Wings (Make 2)
Row 1: Ch 4, sc in 2nd ch from hook, sc in next st, hdc in last st (3)
Row 2: Ch 2, turn, 2 hdc in first st, hdc in next st, sl st in last st (4)
Row 3: Ch 1, turn, sc in each st across (4)
Row 4: Fasten off, leaving a long tail for sewing.
Attach the wings to the sides of the body near the middle-back, with the point of the wings facing outward.
Horns (Make 2)
Round 1: 4 sc in mc (4)
Round 2: (1 sc, inc) x 2 (6)
Round 3: sc around (6)
Fasten off and leave a long tail for attaching to the head. Place the horns near the top of the head, evenly spaced from the center.
Tail
Round 1: 4 sc in mc (4)
Round 2: inc around (8)
Rounds 3-5: sc around (8)
Round 6: dec around (4)
Fasten off, leaving a tail for sewing. Attach the tail to the back of the body.
Embroidering the Features
- Eyes: Attach safety eyes or embroider them on around Round 7 of the head. There should be 1 stitch between the eyes.
- Mouth: Use a small amount of yarn to embroider a small smiling mouth below the eyes, spanning 1-2 stitches.
Comb (Now Fairy Dragon Spikes)
Row 1: Ch 3, hdc in 2nd ch from the hook, sl st in the next st (spike).
Row 2: Repeat to create 3 spikes total.
Fasten off and leave a long tail for sewing.
Attach the spikes along the top of the dragon’s head, from between the horns to the back of the neck.
Your Fairy Dragon is now complete! Enjoy your magical creation!